Amplify authentication: How to Sync DynamoDB user with Cognito account
Amplify authentication seems to be an easy way to add an authentication layer on your App.
However, after you happily signUp and signIn with the out-of-box form, you realize that any function requires user identification, like showing all the posts of a specific user is not available. Because Amplify authentication under the hood is using "AWS Cognito" service, which is not in the same realm of the data models you created for your App.
In your App, you may set up Data model "User" and "Post". After user signUp, the new account only exists in the authentication layer, which is with the Cognito service. Meanwhile, the "User" table you created is still empty.
AWS should have been aware of this awkward situation as this seems to be a common complain, but nothing seems moving in the direction of smoothing out the issue. Maybe in the future AWS will raise their magic wand to bridge these two realms.
But for now, let's explore one solution, that is to use lambda function to automatically create user in database upon signUp.
set up expo project
Firstly, create a expo project with the new expo router (file-based routing)
npx create-expo-app@latest -e with-router amplify-auth
npx expo start
// touch app/index.js, app folder is created with "hello world" index.js
now, optionally we can create app/_layout.js and write code like below:
import React from "react";
import { Stack } from "expo-router";

const RootLayout = () => {
  return <Stack />;
};

export default RootLayout;
install Amplify libraries
in expo root folder
npm install aws-amplify amazon-cognito-identity-js @react-native-community/netinfo @react-native-async-storage/async-storage
set up amplify
- if it's the first time using amplify, need to install command line tool globally,followed by
amplify configuration, it will guide you to select a region and create IAM user for amplify. This user will have AdministratorAccess-Amplify permission policy.
npm i -g @aws-amplify/cli
amplify configure
-
create Amplify app
You can use AWS amplify console to create new app or using CLI
amplify init

//below is the output
Note: It is recommended to run this command from the root of your app directory
? Enter a name for the project amplifyauth
The following configuration will be applied:

Project information
| Name: amplifyauth
| Environment: dev
| Default editor: Visual Studio Code
| App type: javascript
| Javascript framework: react-native
| Source Directory Path: src
| Distribution Directory Path: /
| Build Command: npm run-script build
| Start Command: npm run-script start

? Initialize the project with the above configuration? Yes
Using default provider  awscloudformation
? Select the authentication method you want to use: AWS profile

For more information on AWS Profiles, see:
https://docs.aws.amazon.com/cli/latest/userguide/cli-configure-profiles.html

? Please choose the profile you want to use default
Adding backend environment dev to AWS Amplify app: d2802inx7uy3a

Deployment completed.
Deploying root stack amplifyauth [ ====================-------------------- ] 2/4
        amplify-amplifyauth-dev-105519 AWS::CloudFormation::Stack     CREATE_IN_PROGRESS             Fri Sep 08 2023 10:55:20…
        DeploymentBucket               AWS::S3::Bucket                CREATE_IN_PROGRESS             Fri Sep 08 2023 10:55:23…
        AuthRole                       AWS::IAM::Role                 CREATE_COMPLETE                Fri Sep 08 2023 10:55:39…
        UnauthRole                     AWS::IAM::Role                 CREATE_COMPLETE                Fri Sep 08 2023 10:55:39…

✔ Help improve Amplify CLI by sharing non-sensitive project configurations on failures (y/N) · no

    You can always opt-in by running "amplify configure --share-project-config-on"
Deployment state saved successfully.
✔ Initialized provider successfully.
✅ Initialized your environment successfully.
✅ Your project has been successfully initialized and connected to the cloud!
Some next steps:

"amplify status" will show you what you've added already and if it's locally configured or deployed
"amplify add <category>" will allow you to add features like user login or a backend API
"amplify push" will build all your local backend resources and provision it in the cloud
"amplify console" to open the Amplify Console and view your project status
"amplify publish" will build all your local backend and frontend resources (if you have hosting category added) and provision it in the cloud


Pro tip:
Try "amplify add api" to create a backend API and then "amplify push" to deploy everything
now, we can enable Amplify Studio - UI to configure amplify or use CLI on local machine. ** We need to be sure to sync cloud configuration with local configuration. ** Generally, whenever making change on Amplify studio, run "amplify pull" to pull to local machine. Whenever making change by using CLI, run "amplify push" to sync to cloud.
- set up Authentication (backend)
amplify add auth
It's a very long conversation with AWS, in this project, we are just making a simple login with email/password only, no social login or MFA.
In order to sync cognito account with dynamo DB user later, pay attention to below question:
 Do you want to configure Lambda Triggers for Cognito? Yes
? Which triggers do you want to enable for Cognito Pre Sign-up
? What functionality do you want to use for Pre Sign-up Create your own module
The custom function file is located at [app-root-dir]/amplify/backend/function/[function-name]/src/index.js
Let's add a simply printout of the cognito events.
We have to return event object that Cognito will use to continue with the authentication workflow.
If we don't return event, will get error like "Unrecognized lambda output".
//[app-root-dir]/amplify/backend/function/[function-name]/src/index.js
exports.handler = async (event) => {
  console.log(`debug cognito EVENT: ${JSON.stringify(event)}`);
  return event;
};
since the file is edited locally, don't forget to run amplify push
If we did not add "Lambda Triggers for Cognito" when calling amplify add auth, we can later use amplify update auth to add the function.
Below is the steps:
amplify update auth
// select "add lambda function", a new folder amplify/backend/function will be created locally, but empty

amplify add function
// after writing function, "amplify push"
-
go to AWS cognito console, click the user pool, then select "User pool properties".
You will see "Pre sign-up lambda trigger" configured, with attached lambda function. If you don't see it, you can manually add it.
-
Update expo App code to add Authenticator
first we need to install libraries for Amplify UI.
Amplify UI docs for Authenticator
What is Amplify UI?
It's a collection of components that simplify the UI development. For example, we don't need to write any front-end code for signIn/signUp form. At this moment, only "Authenticator" and "In-App Messaging" are supported for React Native. There are more components available for other frameworks.
npm install @aws-amplify/ui-react-native aws-amplify react-native-safe-area-context amazon-cognito-identity-js @react-native-community/netinfo @react-native-async-storage/async-storage react-native-get-random-values react-native-url-polyfill
edit app/_layout.js, add below import
import { Amplify } from "aws-amplify";
import awsconfig from "../src/aws-exports";
Amplify.configure(awsconfig);
I have seen some tutorial to wrap RootLayout with withAuthenticator like this:
export default withAuthenticator(RootLayout);
However after that I only get a empty screen on the simulator. I don't know why it's like that. It seems with older version of expo@48.x.x, it still works, but not with expo@49.x.x
So I wrap authenticator in the index.js, and it works.
// app/index.js

import { Button, StyleSheet, Text, View } from "react-native";
import {
  useAuthenticator,
  withAuthenticator,
} from "@aws-amplify/ui-react-native";

function SignOutButton() {
  const { signOut } = useAuthenticator();
  return <Button title="Sign Out" onPress={signOut} />;
}

function Page() {
  return (
    <View style={styles.container}>
      <View style={styles.main}>
        <Text style={styles.title}>Hello World</Text>
        <SignOutButton />
      </View>
    </View>
  );
}

export default withAuthenticator(Page);
-
test signUp
now it's time to test signUp flow, run
npx expo startand launch simulator on laptop or use "expo go" mobile app, you will see a standard form including "Sign in","Forgot Password", and "Create Account" button.
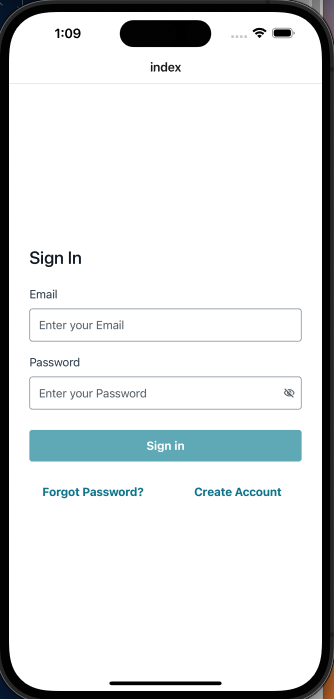
Let's create an account: fill in email and password (In previous amplify add auth step, I change the password rule to be minimum 6 characters and without any other check, so I can simply use 123456 as password in testing phase).
Then a new form will ask me to type in password received in my email box.
To check if our pre-SignUp lambda function is triggered, go to AWS cloudWatch console, select log groups and search for "PreSignup", you should see an entry in "log stream", click it, you can see several log entries, one of them is the instruction we wrote in our lambda function console.log(`debug cognito EVENT: ${JSON.stringify(event)}`);
2023-09-08T06:11:04.137Z	374c1803-8bd0-4061-a9af-e016c178fca3	INFO	debug cognito EVENT: {
    "version": "1",
    "region": "ap-southeast-1",
    "userPoolId": "ap-southeast-1_hKnIMMR91",
    "userName": "297a252c-a061-70c4-4220-d26db32c2656",
    "callerContext": {
        "awsSdkVersion": "aws-sdk-unknown-unknown",
        "clientId": "qms6i1n0tdphvi6r39u7tu0gt"
    },
    "triggerSource": "PreSignUp_SignUp",
    "request": {
        "userAttributes": {
            "email": "quinn@unices.org"
        },
        "validationData": null
    },
    "response": {
        "autoConfirmUser": false,
        "autoVerifyEmail": false,
        "autoVerifyPhone": false
    }
}
So above log shows what a Cognito event looks like. We are mostly interested with th newly created Cognito account ID, which is the value of "userName": "297a252c-a061-70c4-4220-d26db32c2656".
Next we will create Data model and update our lambda function to create a new user with the same ID.
- in amplify studio, go to Data, add Model "User", default there is an
idfield, here we can add one more fieldemail, then deploy.
I find that the deploy phase is especially long..., under the hood, Dynamo DB and table is created, then AppSync is also configured.
Once deployed, we will do amplify pull on local machine.
- amplify add codegen: generate local graphql operations "src/graphql/*/.js
This step will help for future development when need to call graphQL API
amplify add codegen
? Choose the code generation language target javascript
? Enter the file name pattern of graphql queries, mutations and subscriptions src/graphql/**/*.js
? Do you want to generate/update all possible GraphQL operations - queries, mutations and subscriptions Yes
? Enter maximum statement depth [increase from default if your schema is deeply nested] 2
✔ Generated GraphQL operations successfully and saved at src/graphql
- update lambda function to create user in DynamoDB upon signUp. goto folder amplify/backend/function/[function name]/src
first, let's install fetch library
// need to access the Fetch API in our node.js project to make a HTTP request to GraphQL API

npm install node-fetch@2
go back to root directory, add GraphQL API credentials as environmental variables to our existing function
amplify update function

? Select the Lambda function you want to update amplifyauth6635129566351295PreSignup
General information
- Name: amplifyauth6635129566351295PreSignup
- Runtime: nodejs

Resource access permission
- Not configured

Scheduled recurring invocation
- Not configured

Lambda layers
- Not configured

Environment variables:
- Not configured

Secrets configuration
- Not configured

? Which setting do you want to update? Resource access permissions
? Select the categories you want this function to have access to. api
? Select the operations you want to permit on amplifyauth Mutation

You can access the following resource attributes as environment variables from your Lambda function
        API_AMPLIFYAUTH_GRAPHQLAPIENDPOINTOUTPUT
        API_AMPLIFYAUTH_GRAPHQLAPIIDOUTPUT
        API_AMPLIFYAUTH_GRAPHQLAPIKEYOUTPUT
update function like below:
// amplify/backend/function/[function name]/src/index.js

/* Amplify Params - DO NOT EDIT
	API_AMPLIFYAUTH_GRAPHQLAPIENDPOINTOUTPUT
	API_AMPLIFYAUTH_GRAPHQLAPIIDOUTPUT
	API_AMPLIFYAUTH_GRAPHQLAPIKEYOUTPUT
	ENV
	REGION
Amplify Params - DO NOT EDIT */ /**
 * @type {import('@types/aws-lambda').APIGatewayProxyHandler}
 */

const fetch = require("node-fetch");

exports.handler = async (event) => {
  console.log(`debug cognito EVENT: ${JSON.stringify(event)}`);

  const GRAPHQL_ENDPOINT = process.env.API_AMPLIFYAUTH_GRAPHQLAPIENDPOINTOUTPUT;
  const GRAPHQL_API_KEY = process.env.API_AMPLIFYAUTH_GRAPHQLAPIKEYOUTPUT;

  const query = `
    mutation CREATE_USER($input: CreateUserInput!) {
      createUser(input: $input) {
        id
        email
      }
    }
  `;

  const variables = {
    input: {
      id: event.userName,
      email: event.request.userAttributes.email,
    },
  };

  console.log("#### debug variables: ", variables);

  const options = {
    method: "POST",
    headers: {
      "x-api-key": GRAPHQL_API_KEY,
      "Content-Type": "application/json",
    },
    body: JSON.stringify({
      query,
      variables,
    }),
  };

  const response = {};

  try {
    const res = await fetch(GRAPHQL_ENDPOINT, options);
    response.data = await res.json();
    if (response.data.errors) {
      throw new Error(JSON.stringify(response.data.errors));
    }
  } catch (error) {
    response.statusCode = 400;
    response.body = {
      errors: [
        {
          message: error.message,
          stack: error.stack,
        },
      ],
    };
  }

  return event;
};
Now let's test again the signUp flow to verify if new user will be created in "User" table.
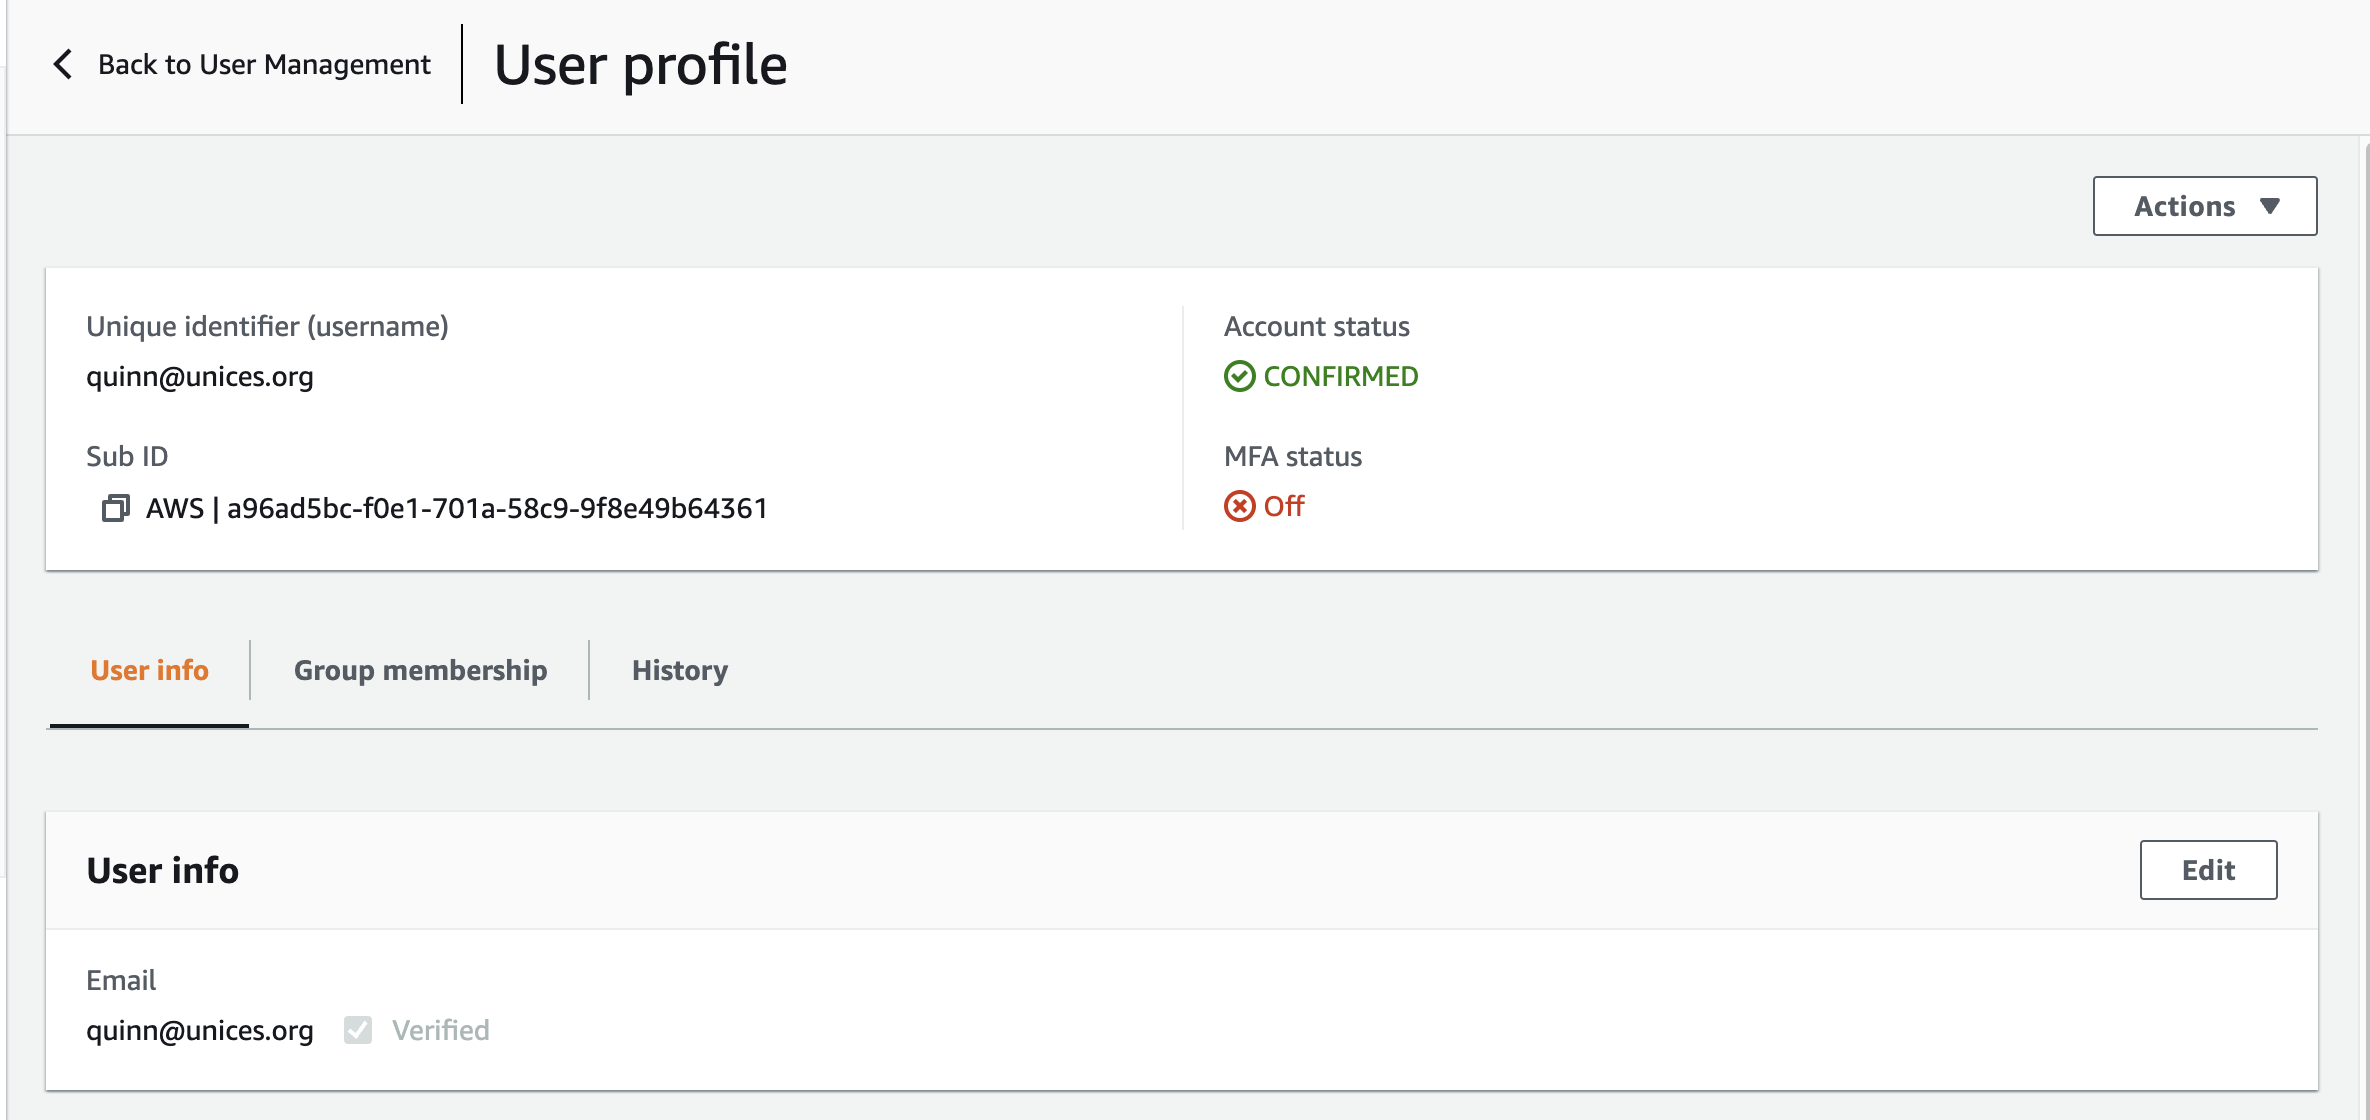
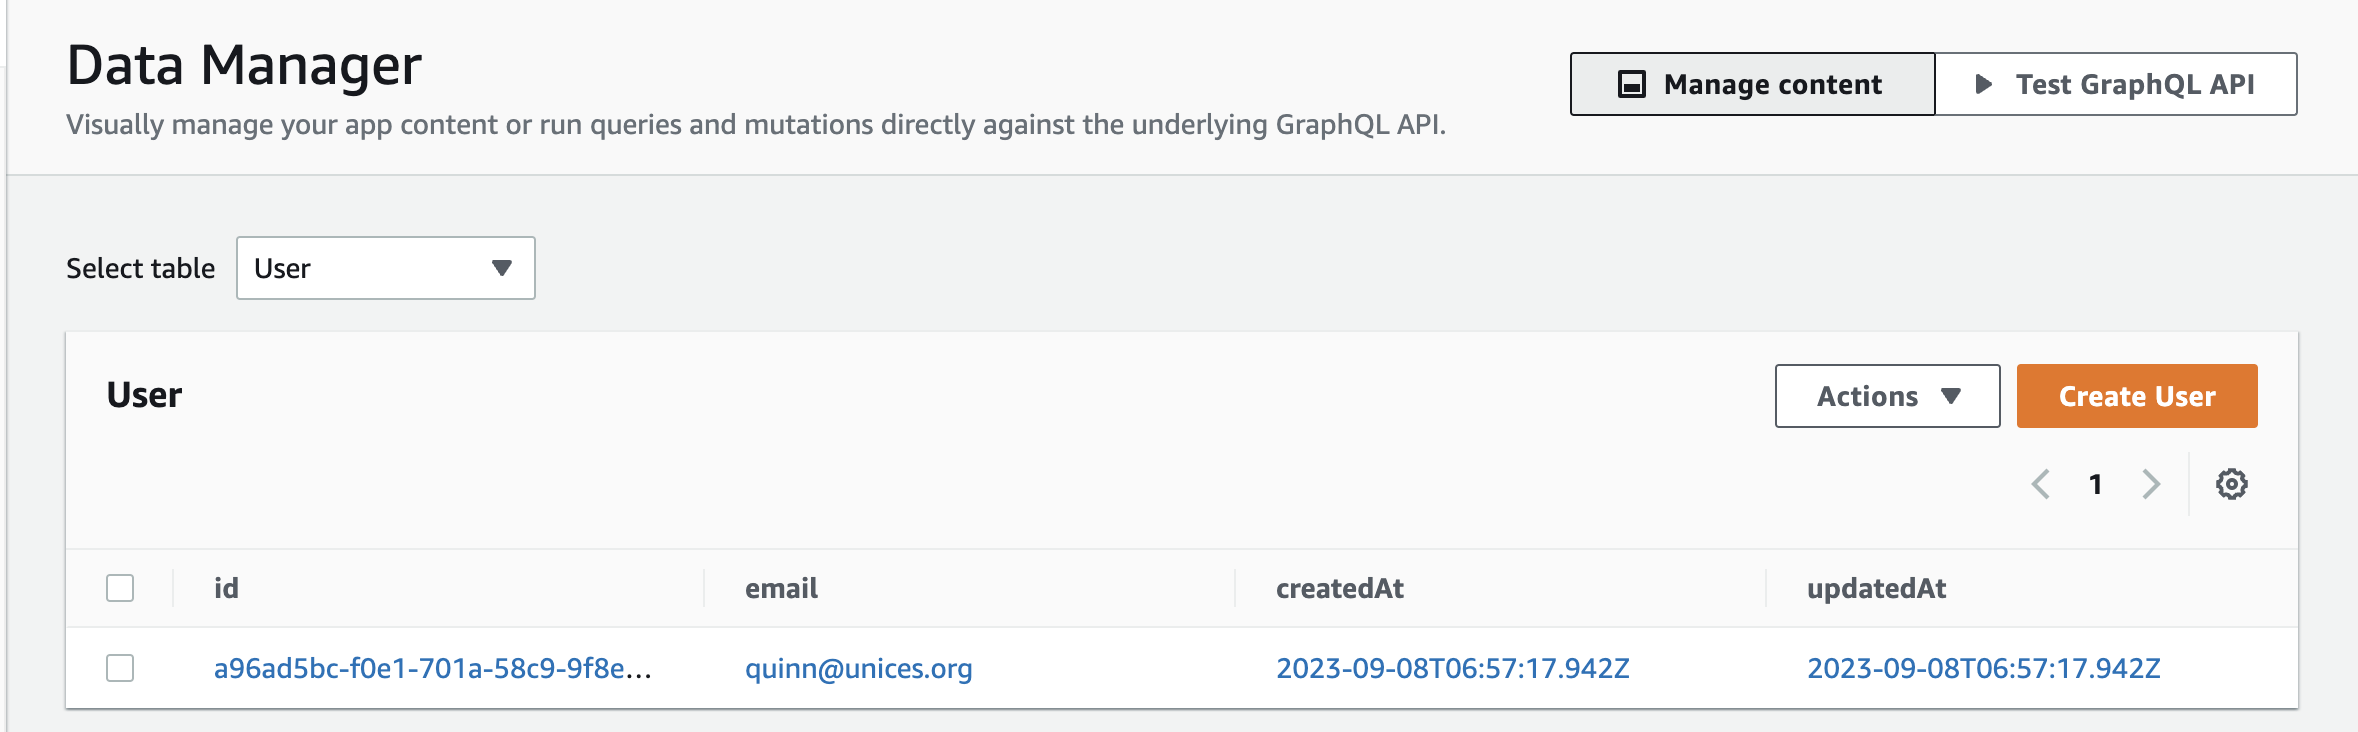
Go to AWS Cognito console or go to "User management" or Amplify Studio, delete the user we created in the last test run.
Then try to signup again. Then go ahead to check the "Content" in Amplify Studio, a new user should be created! The same ID links Cognito account with Dynamo User table.
check out the Cognito user detail:
And the user created in Dynamo DB "User" table:
Error
Here record the error you may encounter and the solution.
metro-file-map: Haste module naming collision
solution: edit metro.config.js
below commented out lines is for project involves tailwind
const { getDefaultConfig } = require("expo/metro-config");
const blacklist = require("metro-config/src/defaults/exclusionList");

// const config = getDefaultConfig(__dirname, {
//   isCSSEnabled: true,
// });

module.exports = {
  //   ...config,
  resolver: {
    blacklistRE: blacklist([/#current-cloud-backend\/.*/]),
  },
  transformer: {
    getTransformOptions: async () => ({
      transform: {
        experimentalImportSupport: false,
        inlineRequires: false,
      },
    }),
  },
};
references
AWS amplify docs for React Native
Amplify UI docs for React Native
https://dev.to/codebeast/how-to-create-a-record-in-dynamodb-when-a-user-signs-up-34e2